These instructions are for a couple friends of mine...so, probably not that interesting for those looking for the usual dog blog entertainment!
 Tools used:
 Level
Jigsaw (you could also use a circular saw and maybe even a hand saw)
Hammer
Drill
Screwdriver attachment for drill
SAFETY GOGGLES!
Gloves while digging and handling the treated wood
Bucket or bowl for mixing cement
Supplies:1.5-inch decking screws
2.5 or 3-inch decking screws
Gate hardware kit (hinges & latches)
Cement (around 80lbs per post)
Lumber:4x4 posts of treated lumber (usually called decking posts) ($7 each They are usually 8-feet tall; be sure to have them cut the posts at the store if you want a shorter post; Home Depot does one cut for free. You need a post for each side of the gate, plus ever 6-feet of fencing, plus corners. Be sure to buy the posts that are intended for outside use/decking.)
For every 6 feet of fencing I used:
three
2x4s two
2x6sfour
dog-eared 6-foot fence slats Also,
three 2x4s and four fence slats for the gate.
The design on my fence was based on a few things:
(a) The lumber that my landlord already had and said I could use.
(b) The sale on dog-eared 6-foot fence slats. ($1/each)
(c) The fact that the yard is really flat, so there would be huge gaps at the bottom of the fence if I used horizontal boarding.
(d) The desire to not see what was on the other side of the fence (a gravel driveway and some trash bins)
(e) The desire to have a 4-foot tall fence.
If you decide on a different style, you’d need different dimensional lumber. : )
What I did:
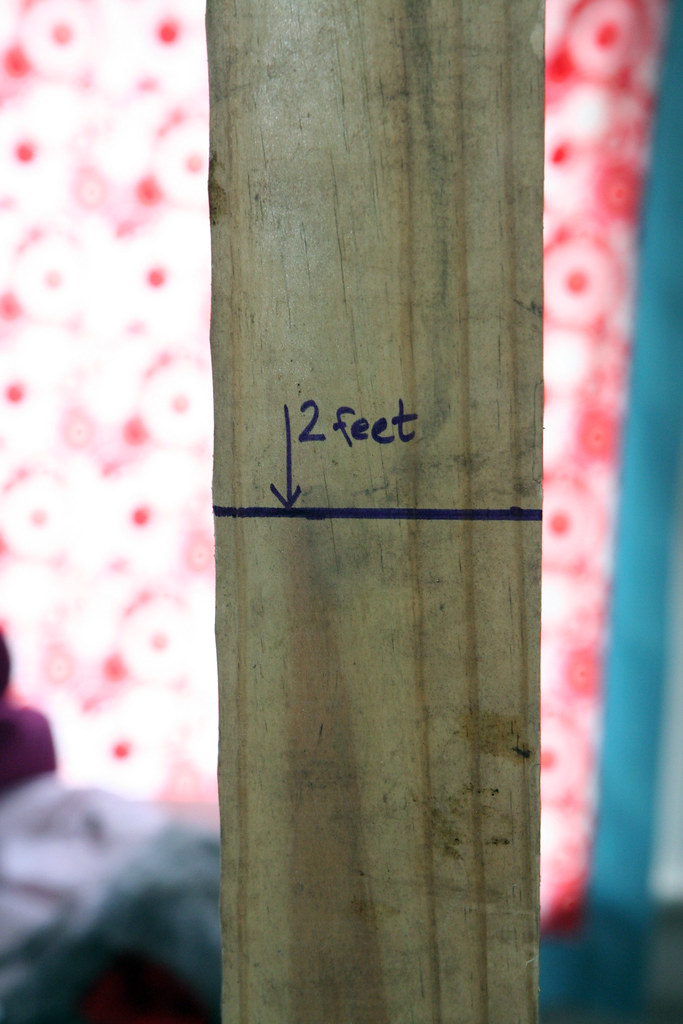
DAY ONE:Put in first post. First, I dug a post-hole for the gate. 1/3rd of the post needs to be underground, so for a 4-foot tall post, you need 6 feet of lumber and a 2-foot deep hole. Always check with the city before digging.
I dug the hole with a garden trowel. This was easier for me than a post-hole digger because my soil is full of rocks. With a bigger yard, it would have been worth it to rent an auger. I loosened the solid with a trowel and scooped the dirt out with my gloved hands.
I marked all the posts at 2-feet and would stick them in to check my progress.
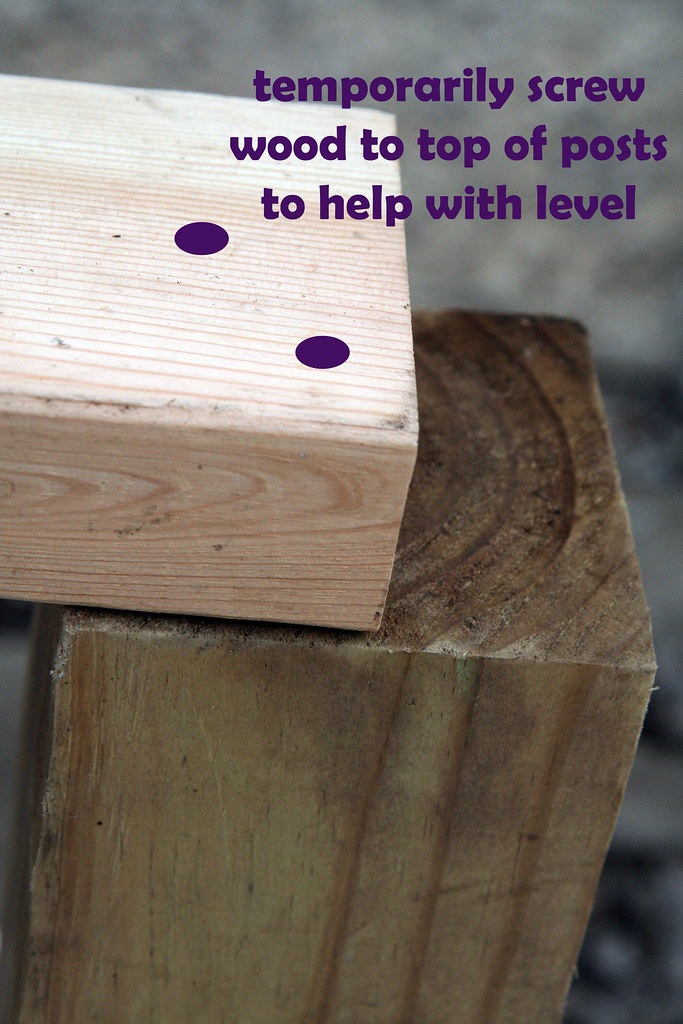
The hole doesn’t need to be much bigger around than the post; a skinny hole uses less cement. Once the hole was deep enough, I stuck the post in it, put the post into what appeared to be a straight up-and-down position, and then screwed the wood into the post at ground level to hold it stable. With the drill, it is very easy to take the screws back out; simply reverse the direction of the drill.

So, here, pretend that the bucket is the hole. The extra piece of wood is screwed to the post, holding it in place. Next, I used my level to check whether the post was really straight. To do this, I checked both (a) whether it was leaning towards or away from me by putting the level against the front of the post and (b) whether the post was leaning to the left or the right by putting the level against the side of the post. I made adjustments by shoving shims under the wood screwed to the post (as in bucket picture above).
You can use wood that will be part of the fence later to shim. You’ll get the wood back and a few holes here and there aren’t going to make a difference.
With my post perfectly upright, I mixed a small amount of cement and began filling the hole. Cement is heavy and hard to work with, so I just mixed small amounts of it at a time in a plastic mixing bowl. As I filled the hole with cement, I re-checked the post with the level. Filling the hole sometimes moved the post a bit and it is important to fix this as you go, because once the hole is full, it is hard to move the post even a tiny bit. Stop filling the hole a few inches below ground level. Add a half-inch layer of dry cement mix to the mostly-filled hole. Leave everything in place.
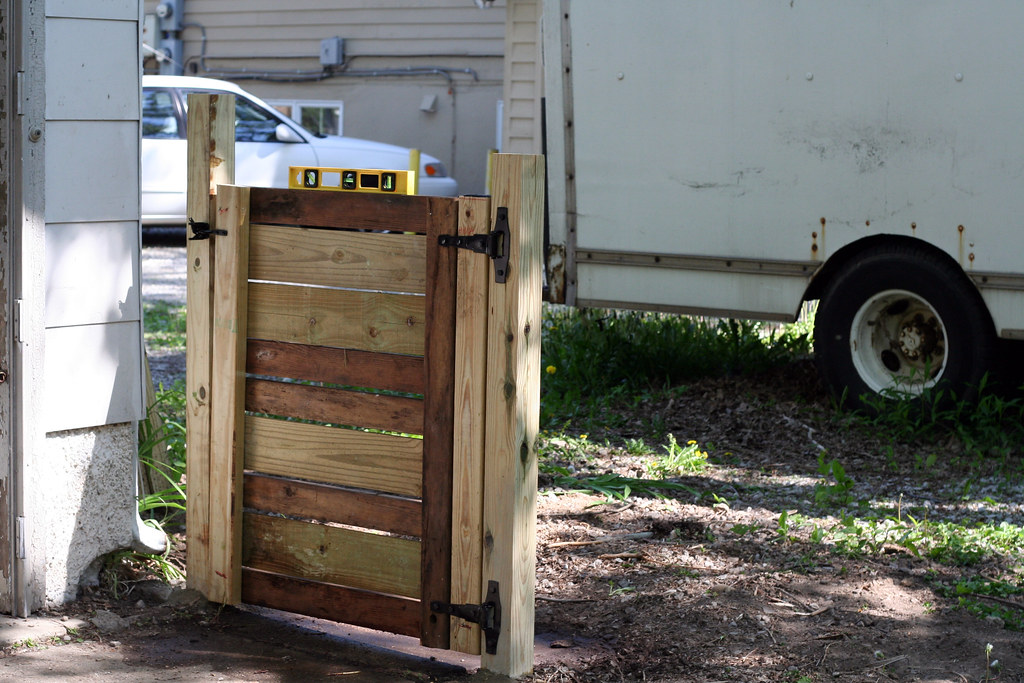
Built the gate.My gate is __ inches wide. I decided on this width because it is the width of the cement slab the gates open over and it is slightly wider than the back door to the house. (You wouldn’t want to put in a skinny gate if the only way to get big furniture and appliances out of the house was through the back door.)
The gate’s design is really simple. It is just like the fence, but there are 2x4s instead of 2x6s at the top and the bottom.
This is the front of the gate.
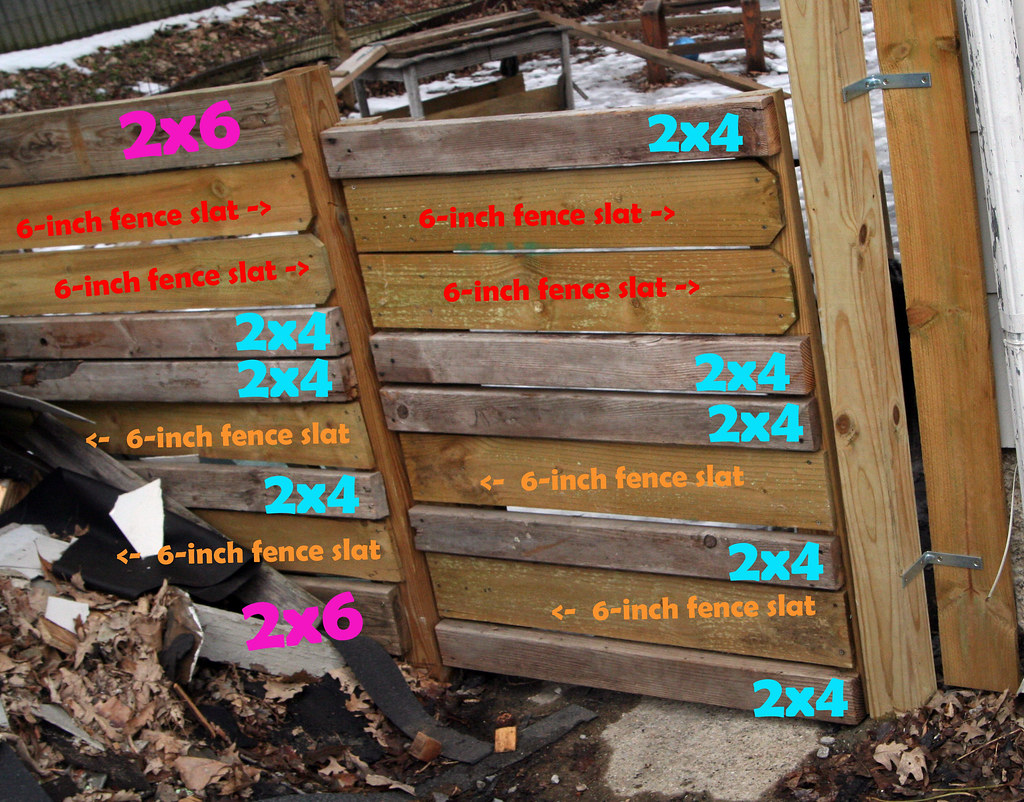
The back uses 3 lengths of 2x4.
It has two on one side because I bought these wide hinges.
To put this together, I first attached the top and bottom 2x4s to the sides, using another piece of wood to keep everything at right angles. I then filled in the rest horizontal pieces. It was pretty straightforward. Wear safety goggles whenever using the drill.
I attached the hinges to the gate.
Put in second post.
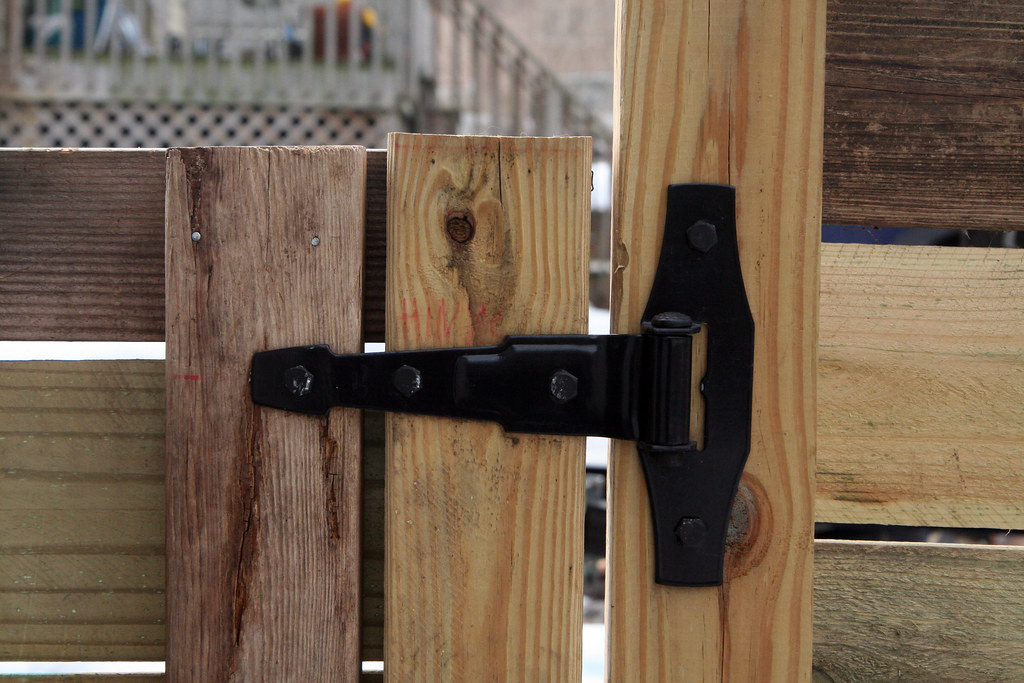
I lay the gate on the ground, next to the first post and made sure that I had marked the correct spot for the second post. Remember that you need to give a little bit of space between the gate and the posts—about a half-inch on each side, depending on hinges being used (see picture of hinge above).
After verifying where the center of my post should be, I dug a hole and stuck my post in. Before “cementing” it, I laid the gate in its place again to double-check the positioning. I used the level and steadied and shimmed the post as before. Because I already had one post in place, I could use the existing post to help hold the next one steady by temporarily screwing a piece of wood in place from the top of the first post to the top of the second. I put cement in the hole as before, checking for levelness as I went.
That was it for day one.
I left the cement to finish drying, leaving the stabilizers and shims on the posts.
I set the gate to the side.
DAY TWO:
Hang the gate.Hanging the gate was the only thing that I really needed help with. It is easy enough; you just need two sets of hands.
Overnight, my cement dried, so I removed the extra wood that I had screwed to the posts.
I put 2x4s on the ground between the posts so that it was easy to rest the gate on them. This established the clearance between the gate and the ground (so if you want more than 2-inches, use more wood or thicker wood.) I placed the gate between the posts, resting on the 2x4s. While my assistant held the gate lightly (stopping it from falling) I checked that the gaps on either side of the gate were about even and made sure that the top board was level.
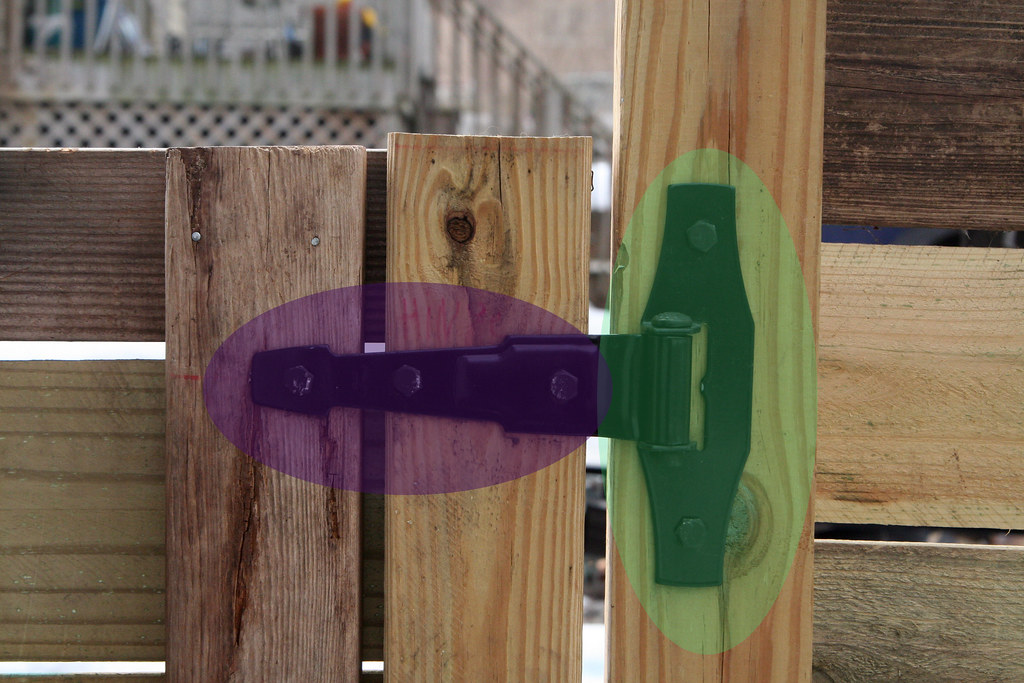
At this point, my hinges were attached to the gate, so the area circled in purple was secured and the area circled in green was hanging loose. I folded the green area out to the post and marked where the screws should go on the post with a pencil. I then laid the gate to the side, disassembled the hinge (the hinges came with instructions for doing this). I drilled guide-holes into the post for the green part of the hinge and attached the green part to the post. Then, with my assistant’s help and following the directions provided with the hinges, I hung the gate, reuniting the green part of the hinge with the purple part.
I then attached the latch to the other side of the gate, following the instructions that came with the hinge & latch kit.
Put in the rest of the posts.Well, I was feeling cool to have the tricky part of the fence-building done! I dug the rest of the holes for the posts and cemented the holes in place using the same stabilizing and leveling techniques I had figured out the day before. If you are using lumber that is pre-cut to 6 or 12-foot lengths, it is important that you get the posts exactly 6-feet apart. The CENTER of each post needs to be 6-feet from the CENTER of the next post. You can check that this is happening by attaching 6-foot lengths of lumber from the top of each post to the top of the next post; and also using the precut lumber as an easy, solid measuring tape!
DAY THREE:
Finish the fence.First, I removed all the extra pieces of wood from the top and sides of the posts.
Then I placed 2x4s on the ground between the posts (at a 90-degree angle to the fence line). I didn’t want my bottom board to be resting on the ground in order to avoid rot. I laid a 2x6 across the boards and against the posts. PLEASE NOTE: At this point, you are mostly working from the “outside” of the yard, attaching boards to the “outside” of the posts. I checked that the 2x6 was level; adjusted the shims if it was not, then screwed it into the post. For most boards, I didn’t need to drill guide holes, the wood screw went straight in.
I suppose you could build the fence panel by panel. I went around the fence line each time, slowly building up higher and higher.
In order to have small gaps between the slats in my fence, I used shims between the boards. Like so:
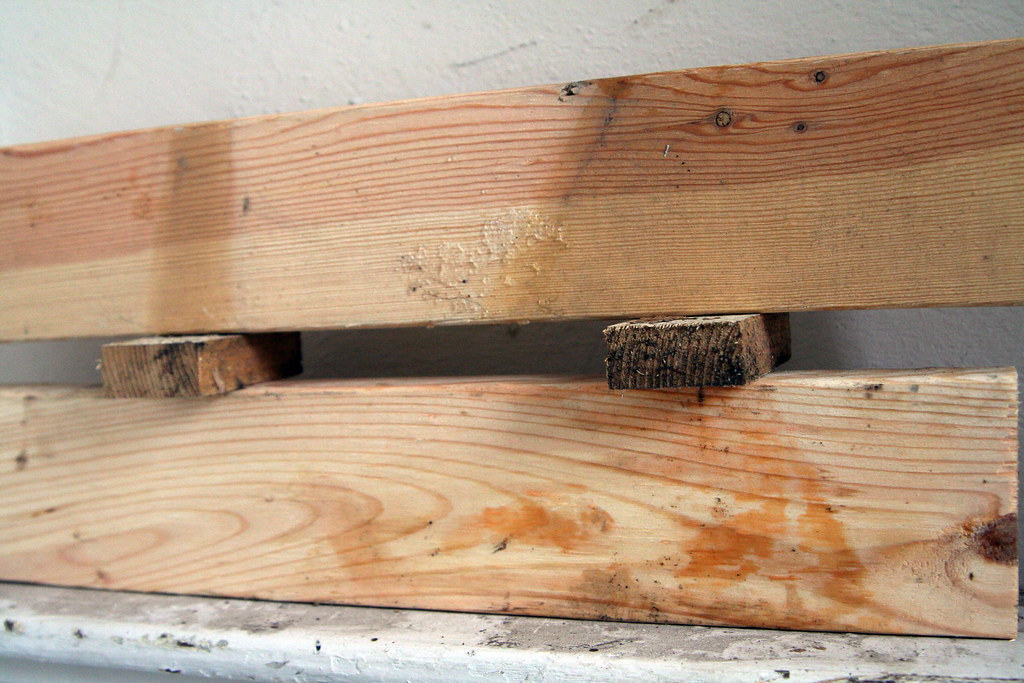
I did check the level on each board. Usually, all I needed to do was move a shim a bit to the right or left in order to get the board level. Sometimes I had to use a hammer to get the shims free once the board was screwed in.
Finishing the fence just means a lot of screwing (ha-ha) I found it really useful to just put on an apron with a pocket for screws and go to work. It is really fast once you get going. You need 2.5 or 3-inch decking screws to attach the thicker lumber (the 2x4s and 2x6s) 1.5-inch screws are sufficient for attaching the dog-eared fence slats.
About the dog-eared fence slats...I put the “bottom” of the slat sometimes on the left and sometimes on the right (as in the picture.) I wasn’t sure if this was going to look super-weird or what, but in the end, I liked the way it looked.
Of course, if you wanted to spend a few extra dollars, you could just buy 1x6s and not worry about the dog ears.
I think that’s it! Let me know if you have any questions!